Grading Parties
"Grading parties" are when course staff gathers to grade a quiz. Each grading party tends to take on the scale of 2-4 hours. The general procedure of a grading party includes two major steps described below.
First, each TA is assigned a question or questions on the quiz to grade. How many questions they are assigned depends on the complexity of those questions. Then, the TA will need to refer to the reference solution for those questions. Sometimes, before the start of the grading party, course leadership will have already created a reference solution for this quiz. If a reference solution does not already exist, then the TA will solve the questions they are assigned and have their solutions approved by course leadership before proceeding to grading.
Second, each TA grades their assigned questions. This is the bulk of the grading party, so the details are outlined in the next section, which goes in depth on using Gradescope.
After describing the grading process itself, this webpage includes an "FAQ" section and a section on grading equity.
Using Gradescope
When you click into an assignment on Gradescope to grade, on the left side of the screen you will see a column of table of contents. Generally, the only ones that will apply to you are "Manage Submissions" and "Grade Submissions."
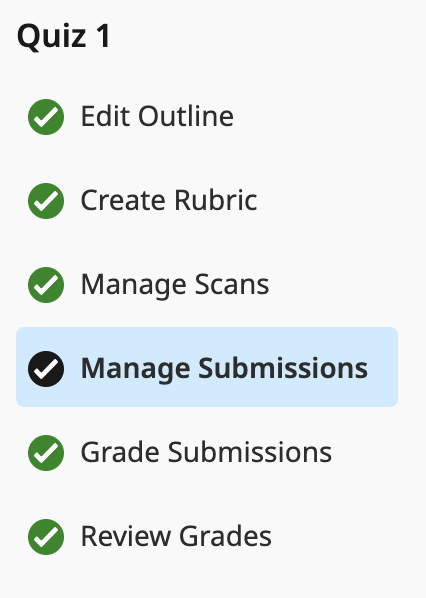
The image above shows what the column looks like when grading is completely finished. After every item is completed, the circle next to it is filled with a green checkmark. When the grading party begins, the circles next to "Manage Submissions," "Grade Submissions," and "Review Grades" will typically be blank.
In the sections below, you will see how to proceed through "Manage Submissions" (which allows you to group submissions) and "Grade Submissions" (which allows you to create and/or apply rubric items to submissions; i.e., grade them).
Manage Submissions (Groups)
In a class of N students, you will have N submissions for the quiz. In some cases, you might loop through all N unique submissions for the questions you are assigned. Most of the time, however, submissions can be grouped together based on their similarity. Grouping submissions allow you to, once you proceed to "Grade Submissions," grade many similar/identical submissions at once. For instance, let us consider if for the question you are grading, the correct answer is to increment the variable count by 1. In this case, all submissions that say count = count + 1 or count += 1 should be grouped together in a group for the correct answer.
Below is an image of what your screen might look like while creating groups. On the left side, you will see many submissions, and you can select multiple of them at once to add them to an existing group or create a new group for them.
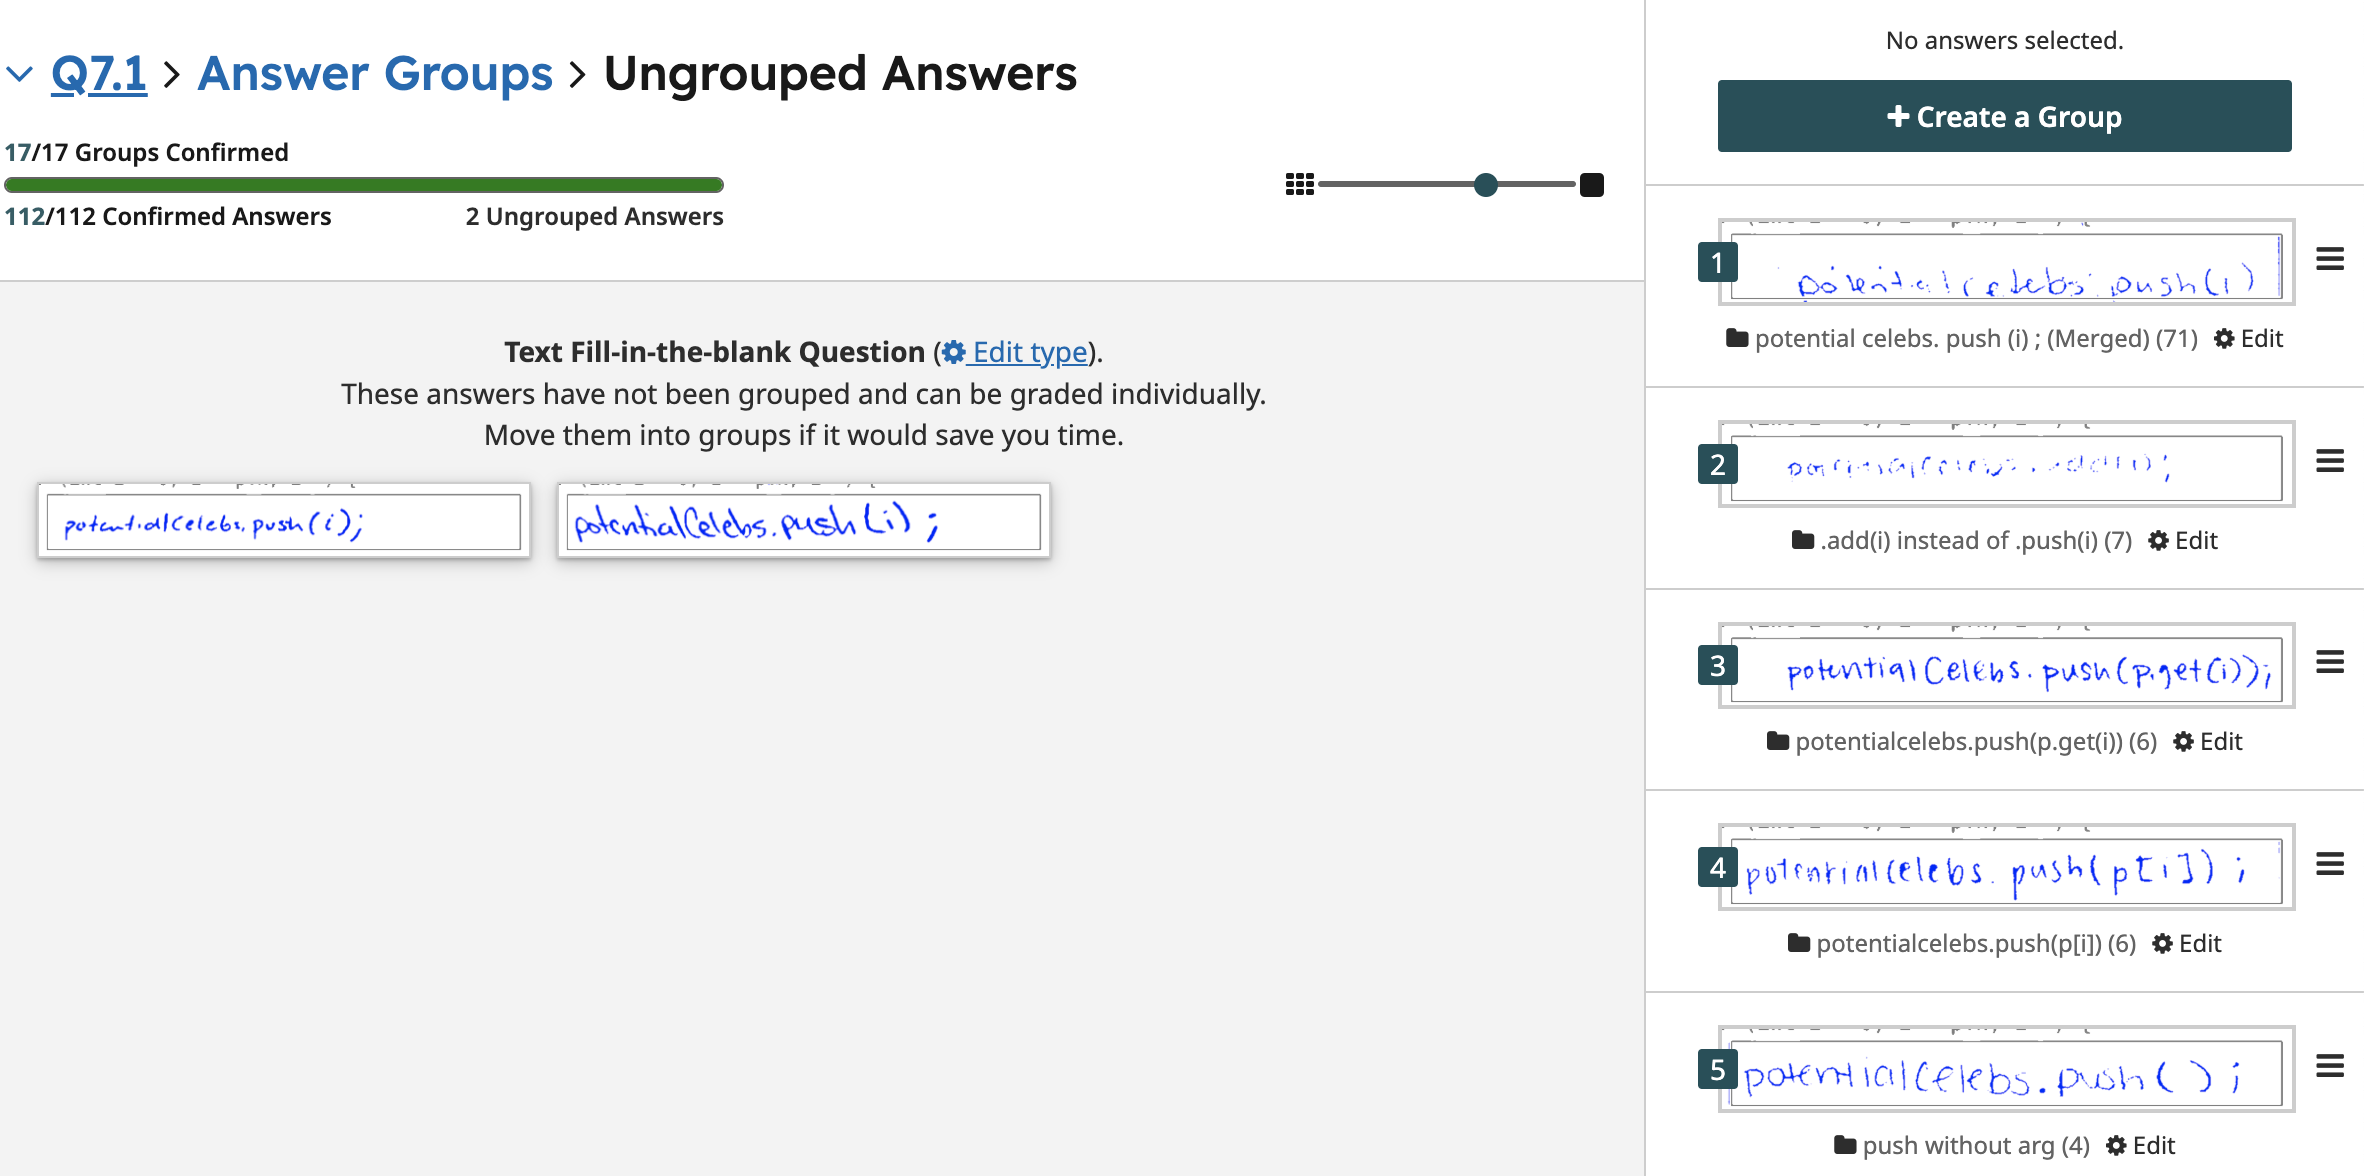
When naming groups, you will want to name them something informative. For example, the correct answer to the question in the picture above is potentialCelebs.push(i); and 71 submissions have potentialCelebs.add(i). You can see that group (1) for the correct answer is named "potential celebs. push (i) ;". (Another appropriate name could just be "correct answer".) Moreover, group (2) for the incorrect answer is ".add(i) instead of .push(i)", which tells us something informative.
Below is a picture of what your screen might look like once you are done grouping submissions. You will see a list of groups you've made.
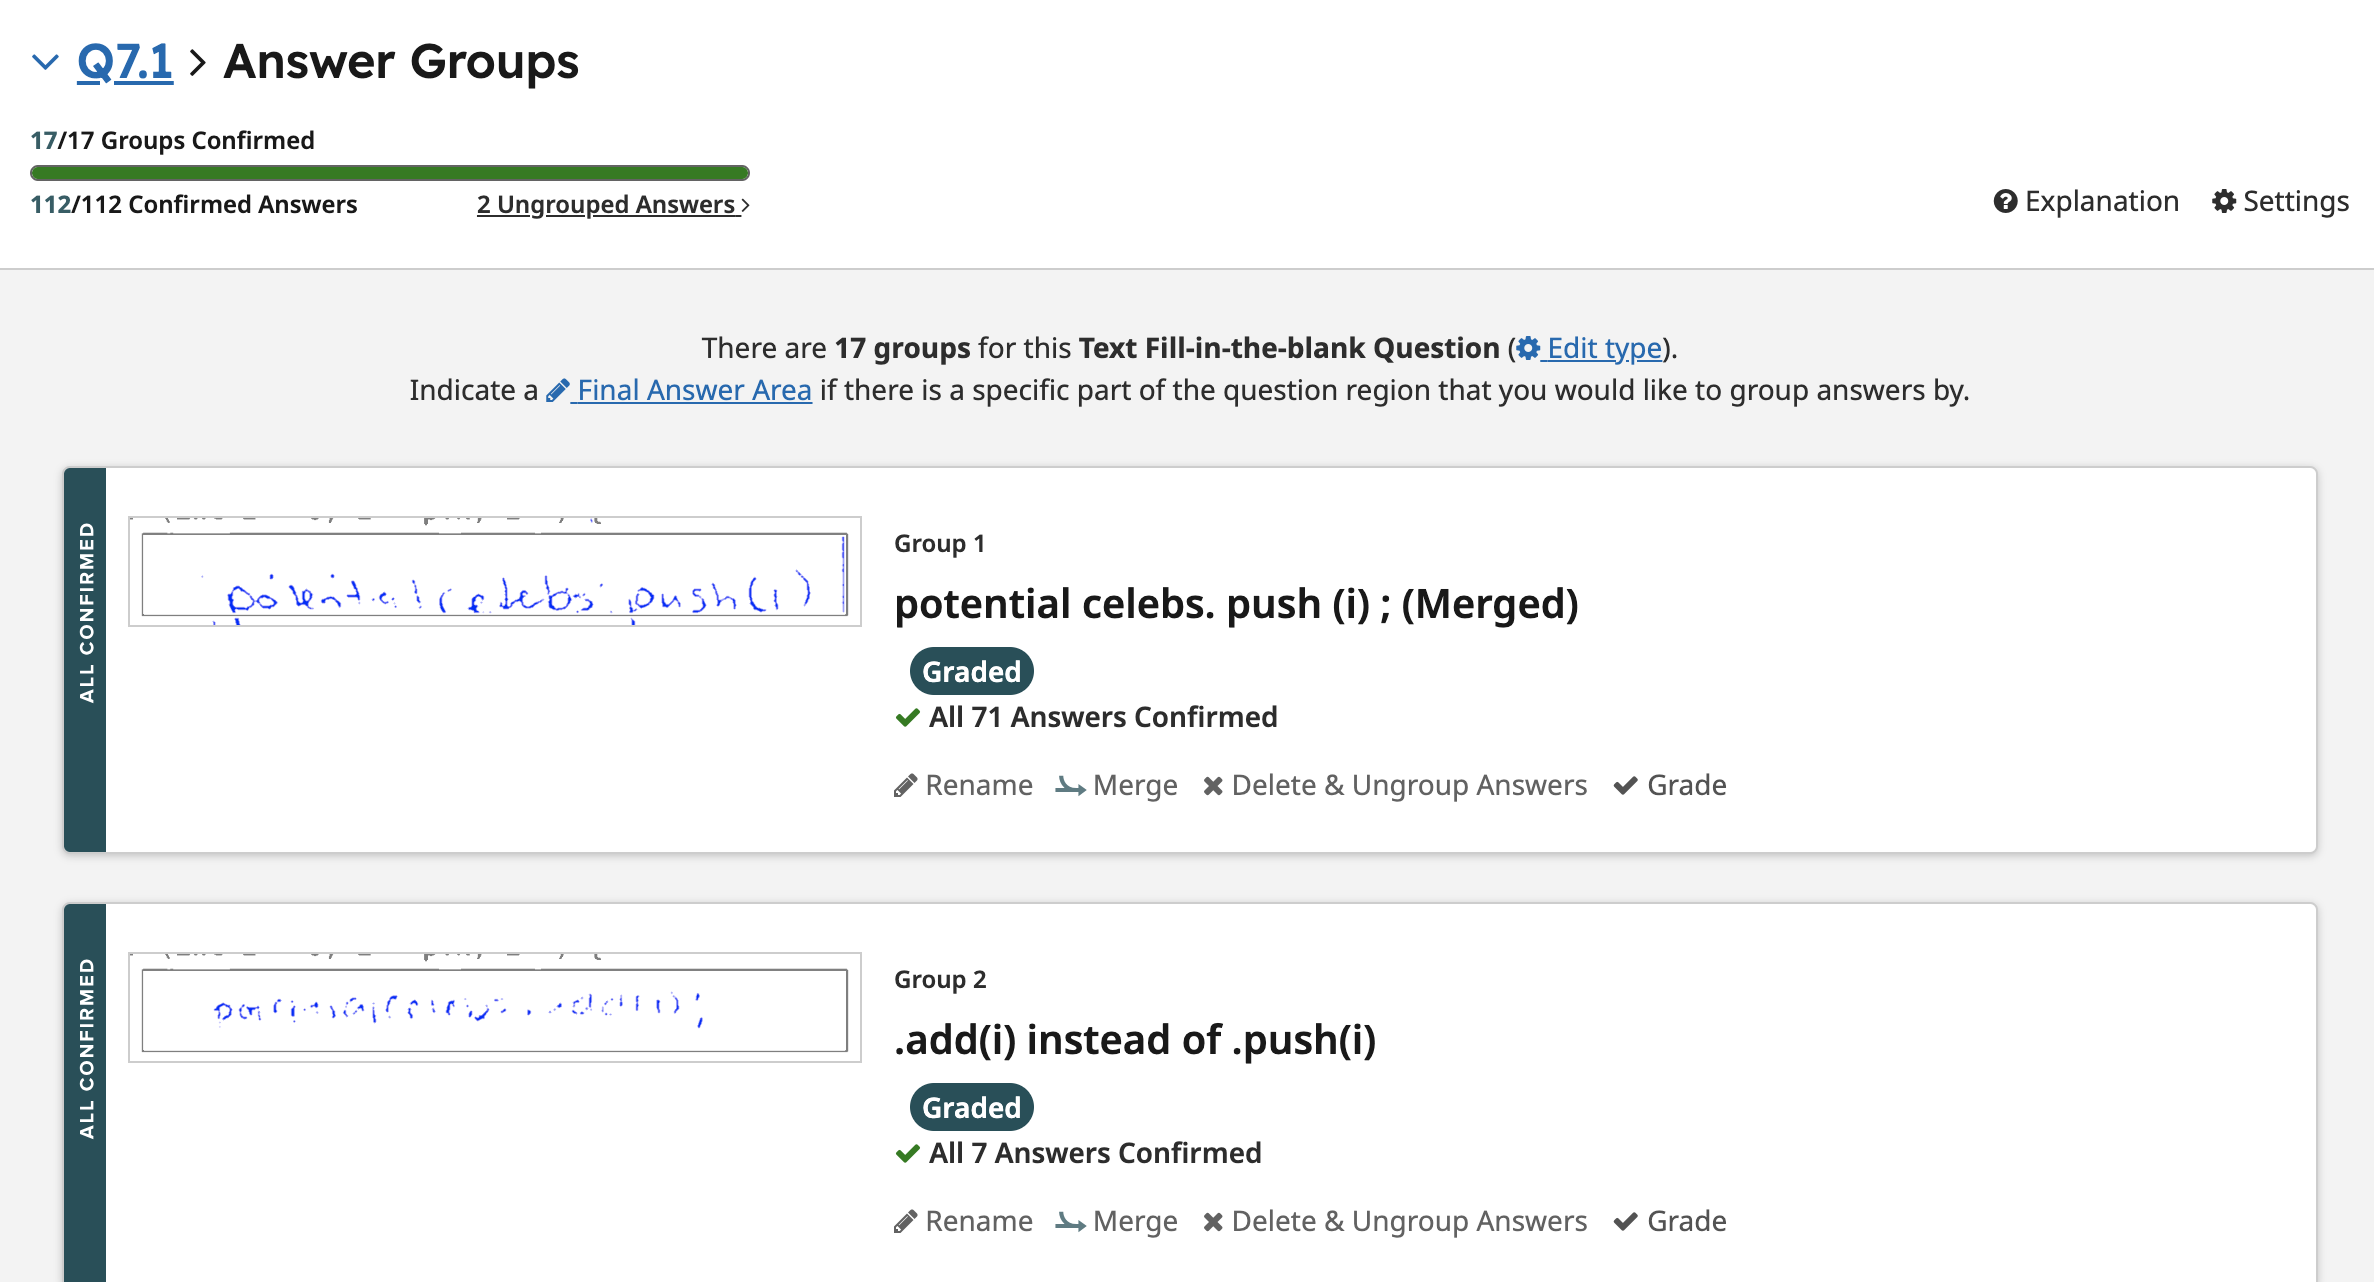
You can see in the picture that there are "2 Ungrouped Answers." If there are a couple very unique answers, you can feel free to leave them ungrouped, and grade them individually once you proceed to the next section ("Grade Submissions").
If in the process of doing this, you have any questions at all, you should immediately raise your hand and ask the professor(s) or a member of course leadership.
Once you completely finish grouping, you should be brought to a webpage that looks like the picture below.
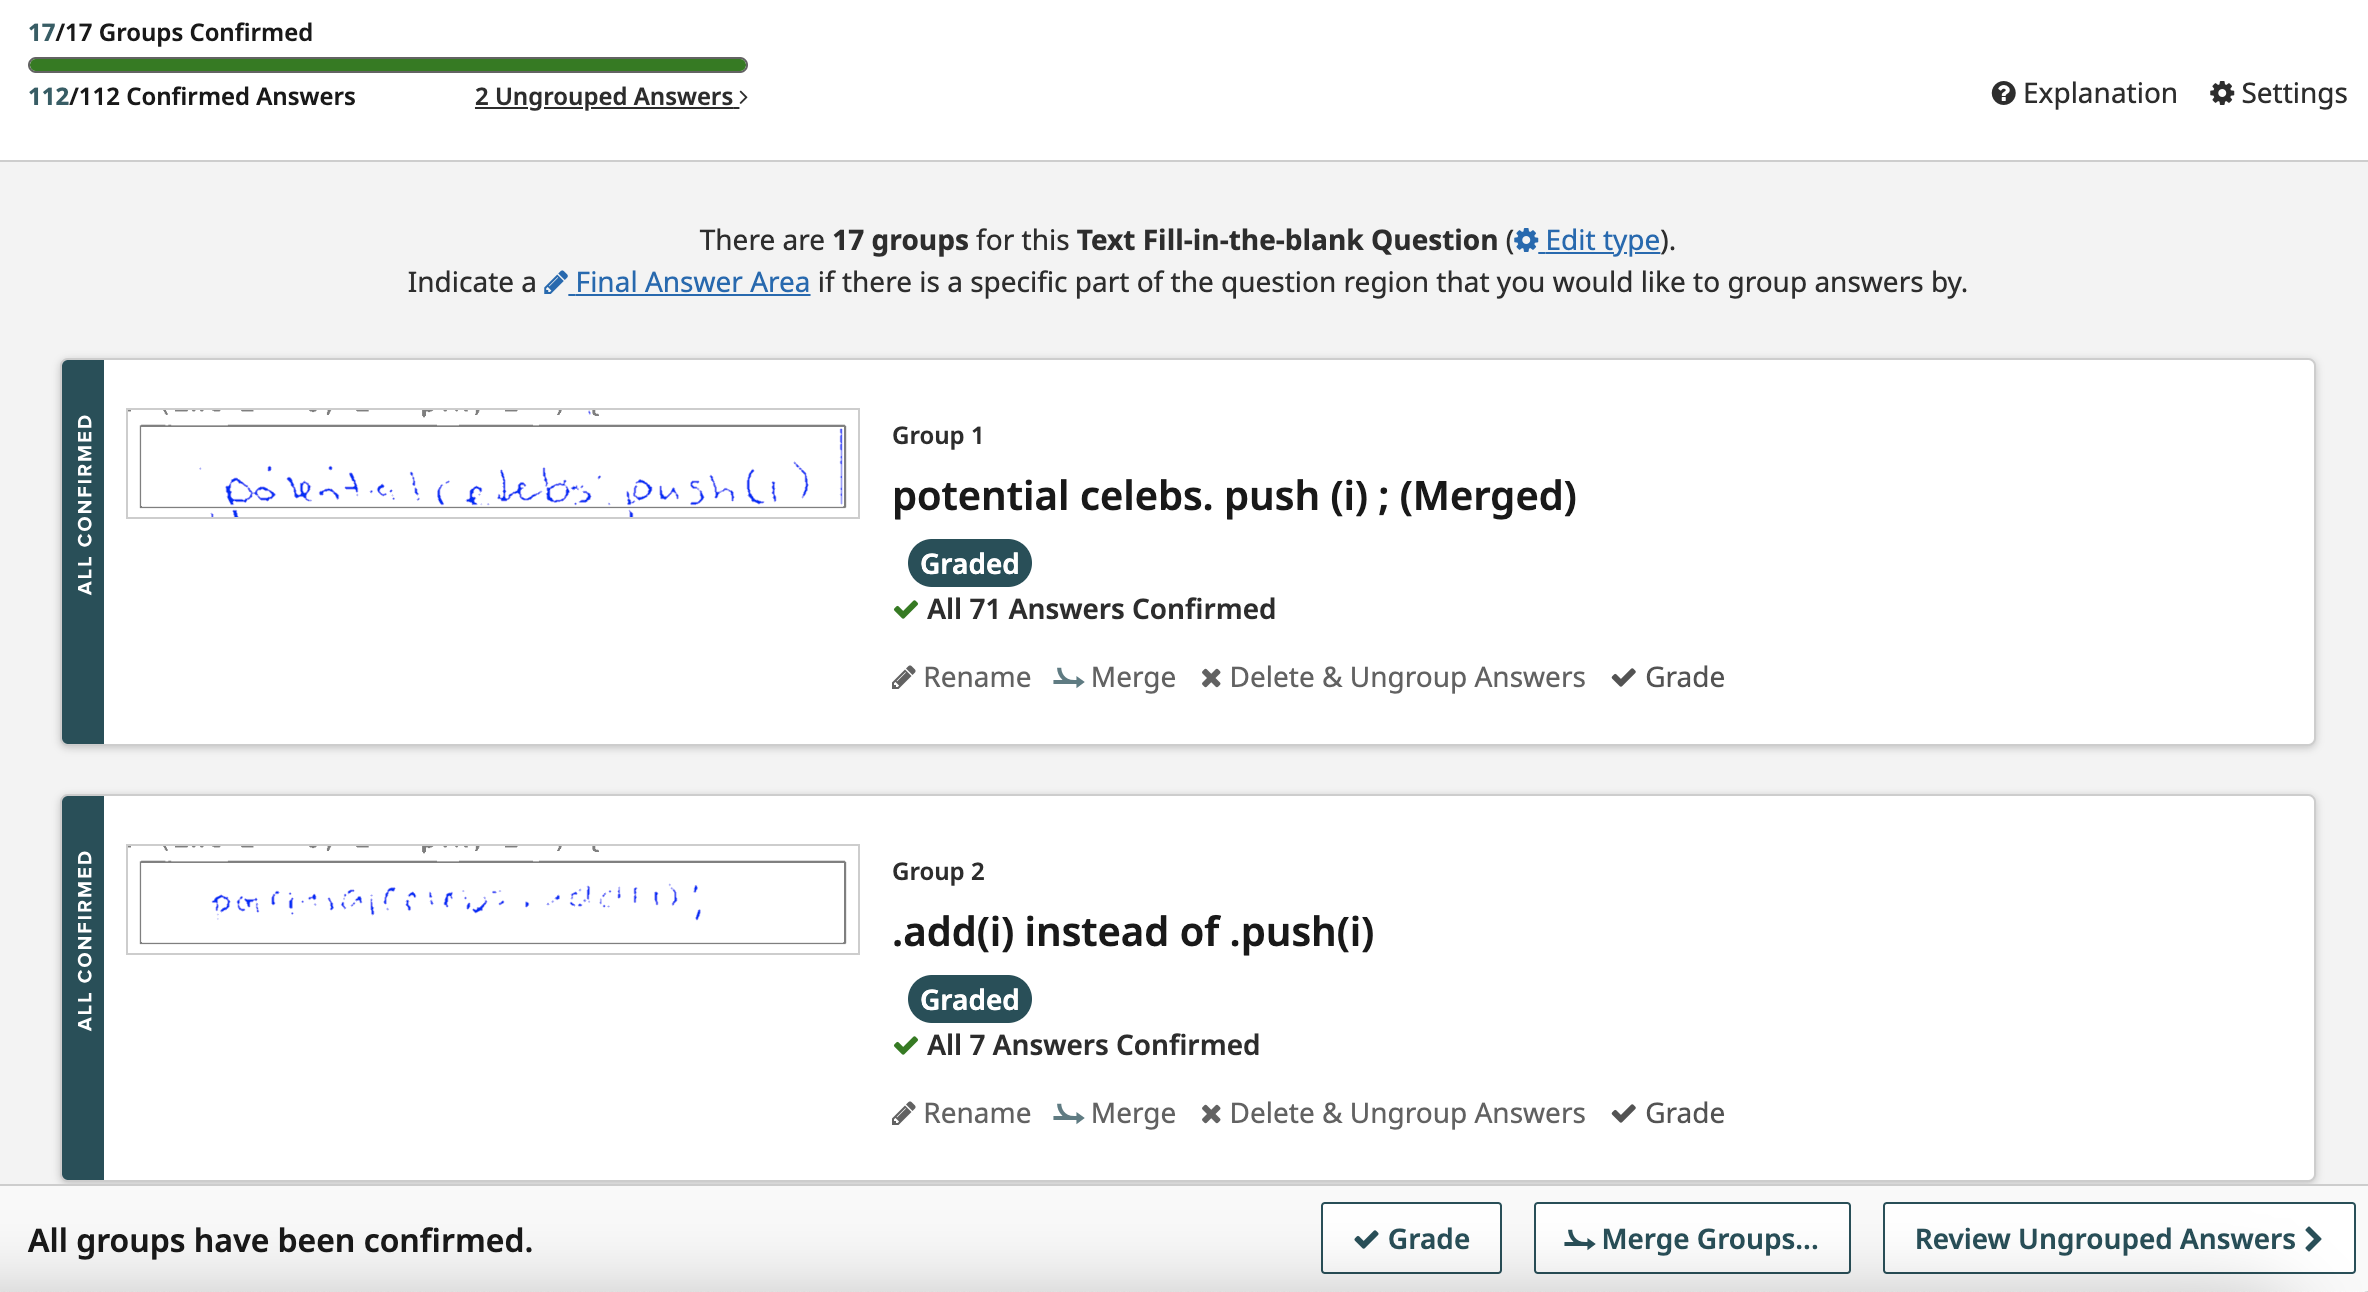
To proceed onto grading, click the "Grade" button (at the bottom of the picture). This will take you to "Grade Submissions."
Grade Submissions (Rubric Items)
When you first enter "Grade Submissions," you should see the "Grading Dashboard," and your screen should look similar to the picture below:
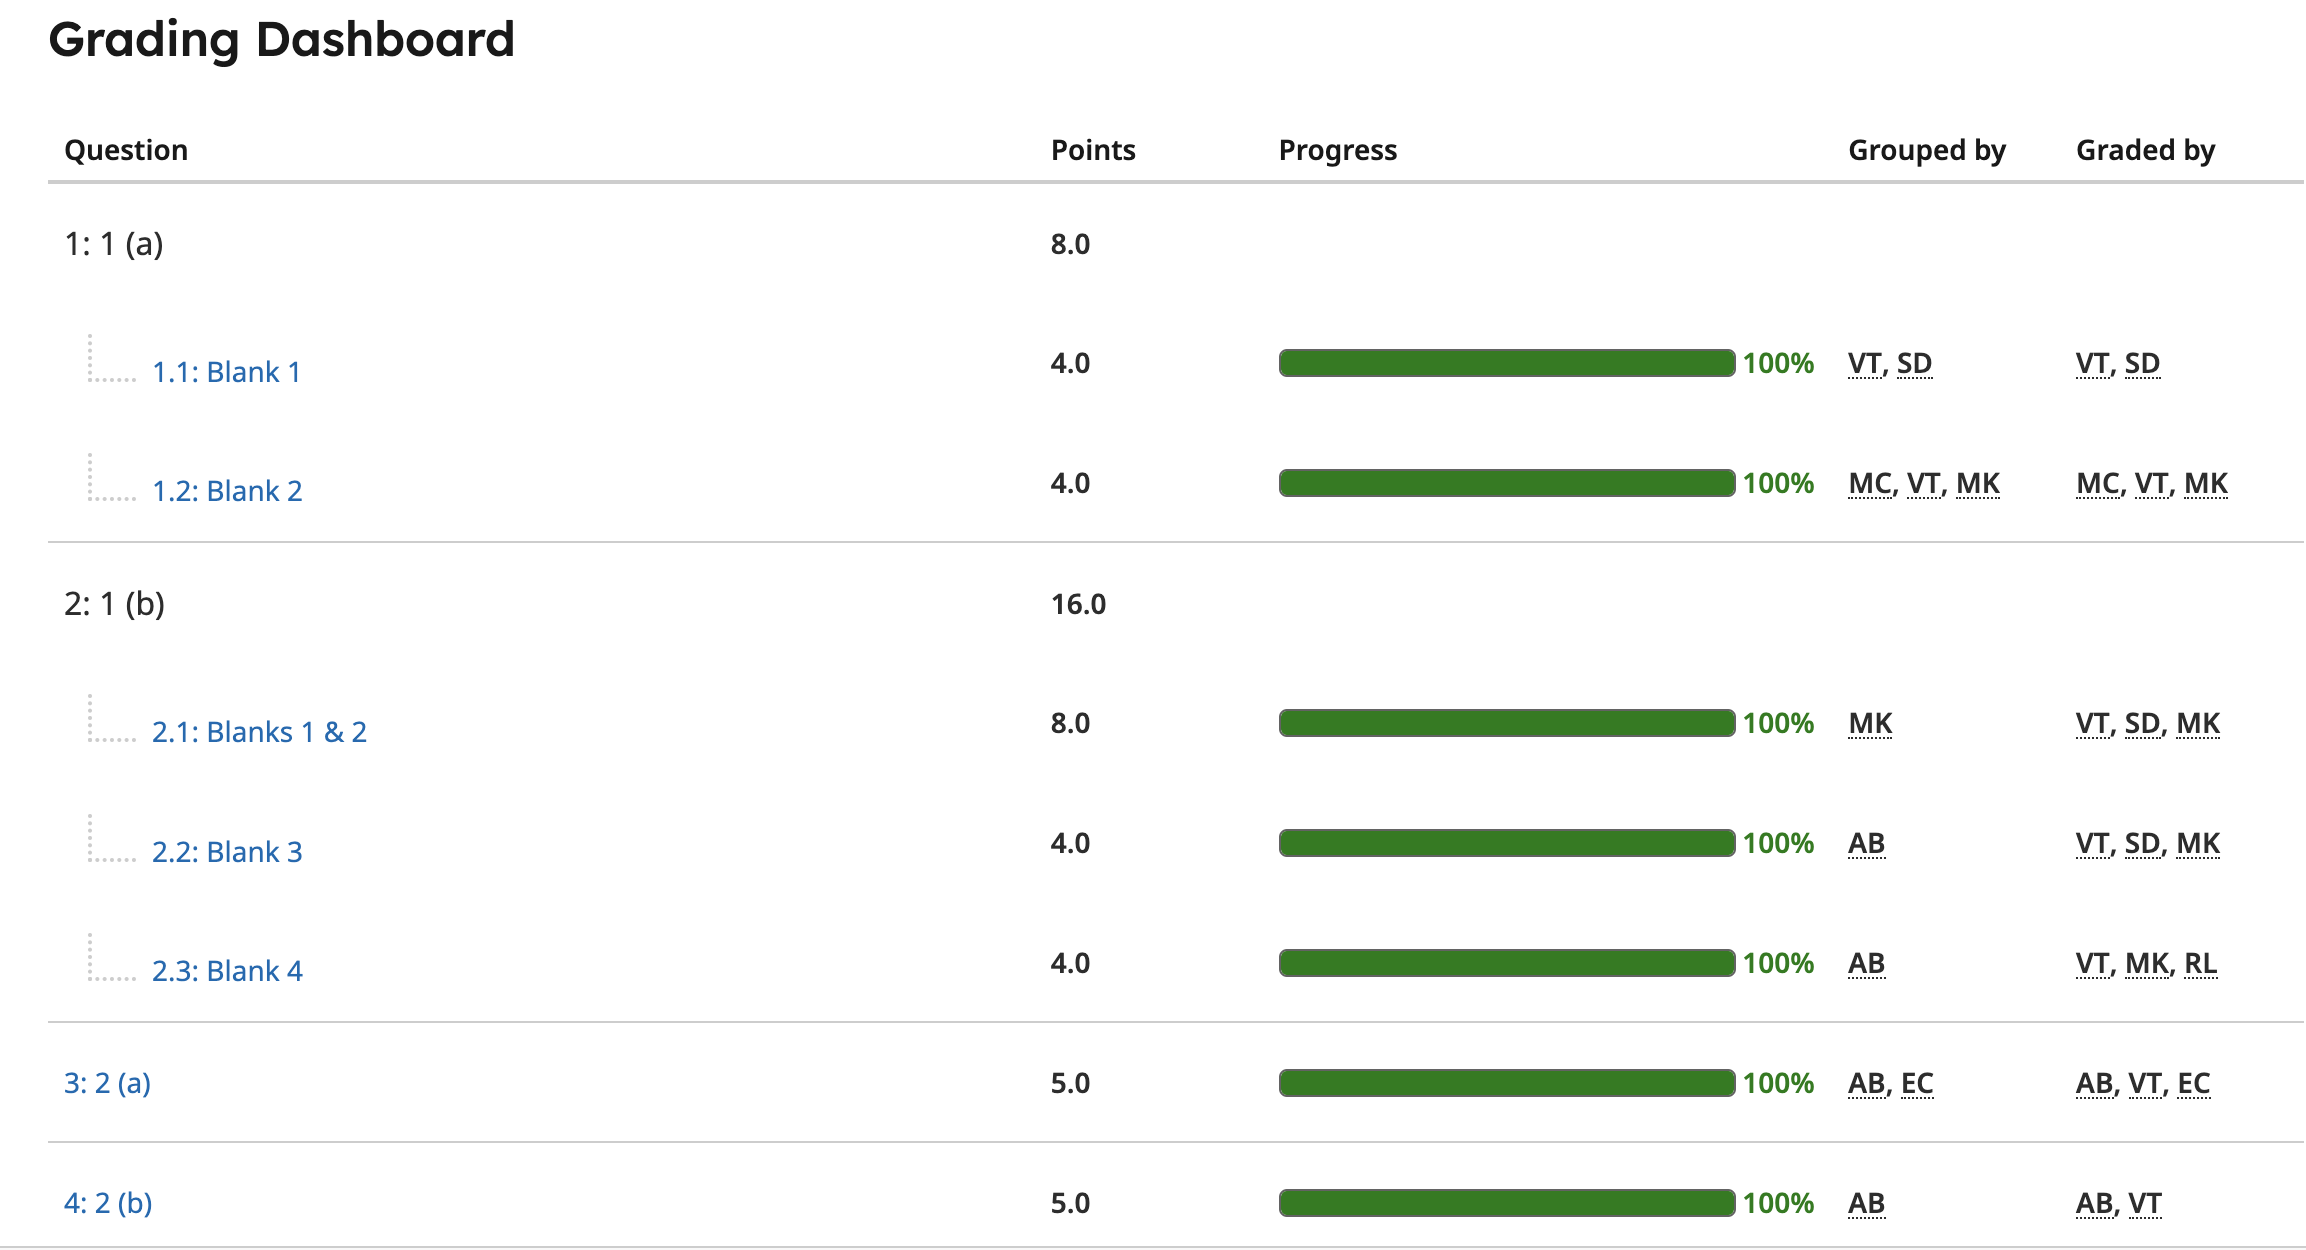
This picture shows the dashboard when grading has been completed; hence, all the progress bars are completely green, showing 100% progress. When you first begin grading, the progress bars and percentages will be lower, and in most cases will start from 0%. As a TA, when brought to the grading dashboard, you should click on the question you have been assigned to grade (blue, link text) to begin grading.
The process of grading submissions is essentially iterating through the groups and/or individual submissions and applying rubric items to each one. Below is a picture of what your screen might look like.
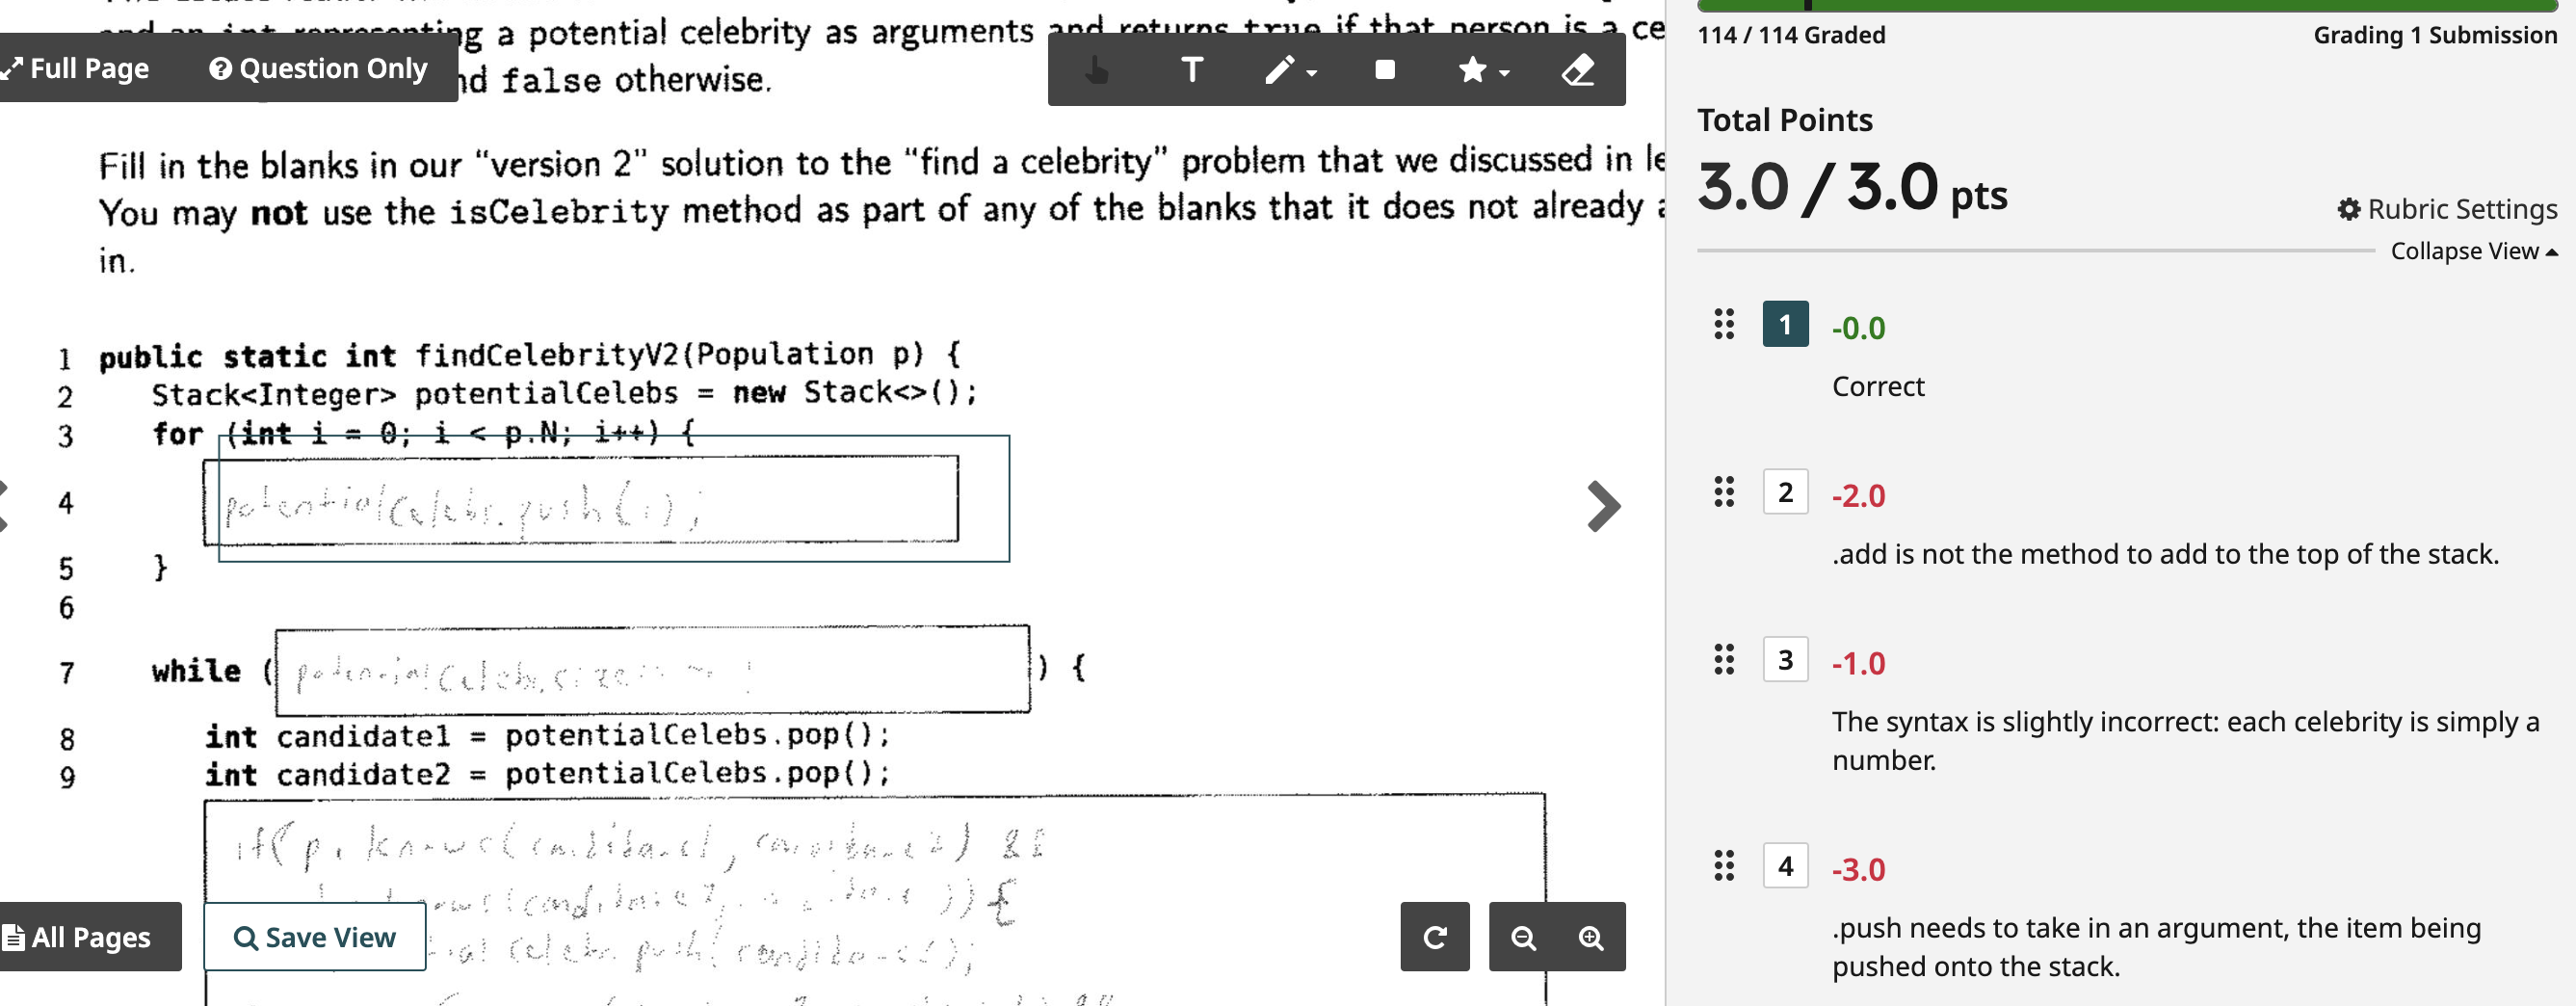
This is when the submission is completely correct. In the picture, all rubric have a corresponding point value. Generally, when you start out grading, there might not be point values assigned yet (they might all show "-0" or "+0"). In general, do not assign points unless otherwise asked to do so: the professor(s) and course leadership will take care of that. Simply apply the rubric items without thinking about the point values.
Below is a picture of what your screen might look like when the submission is not completely correct.
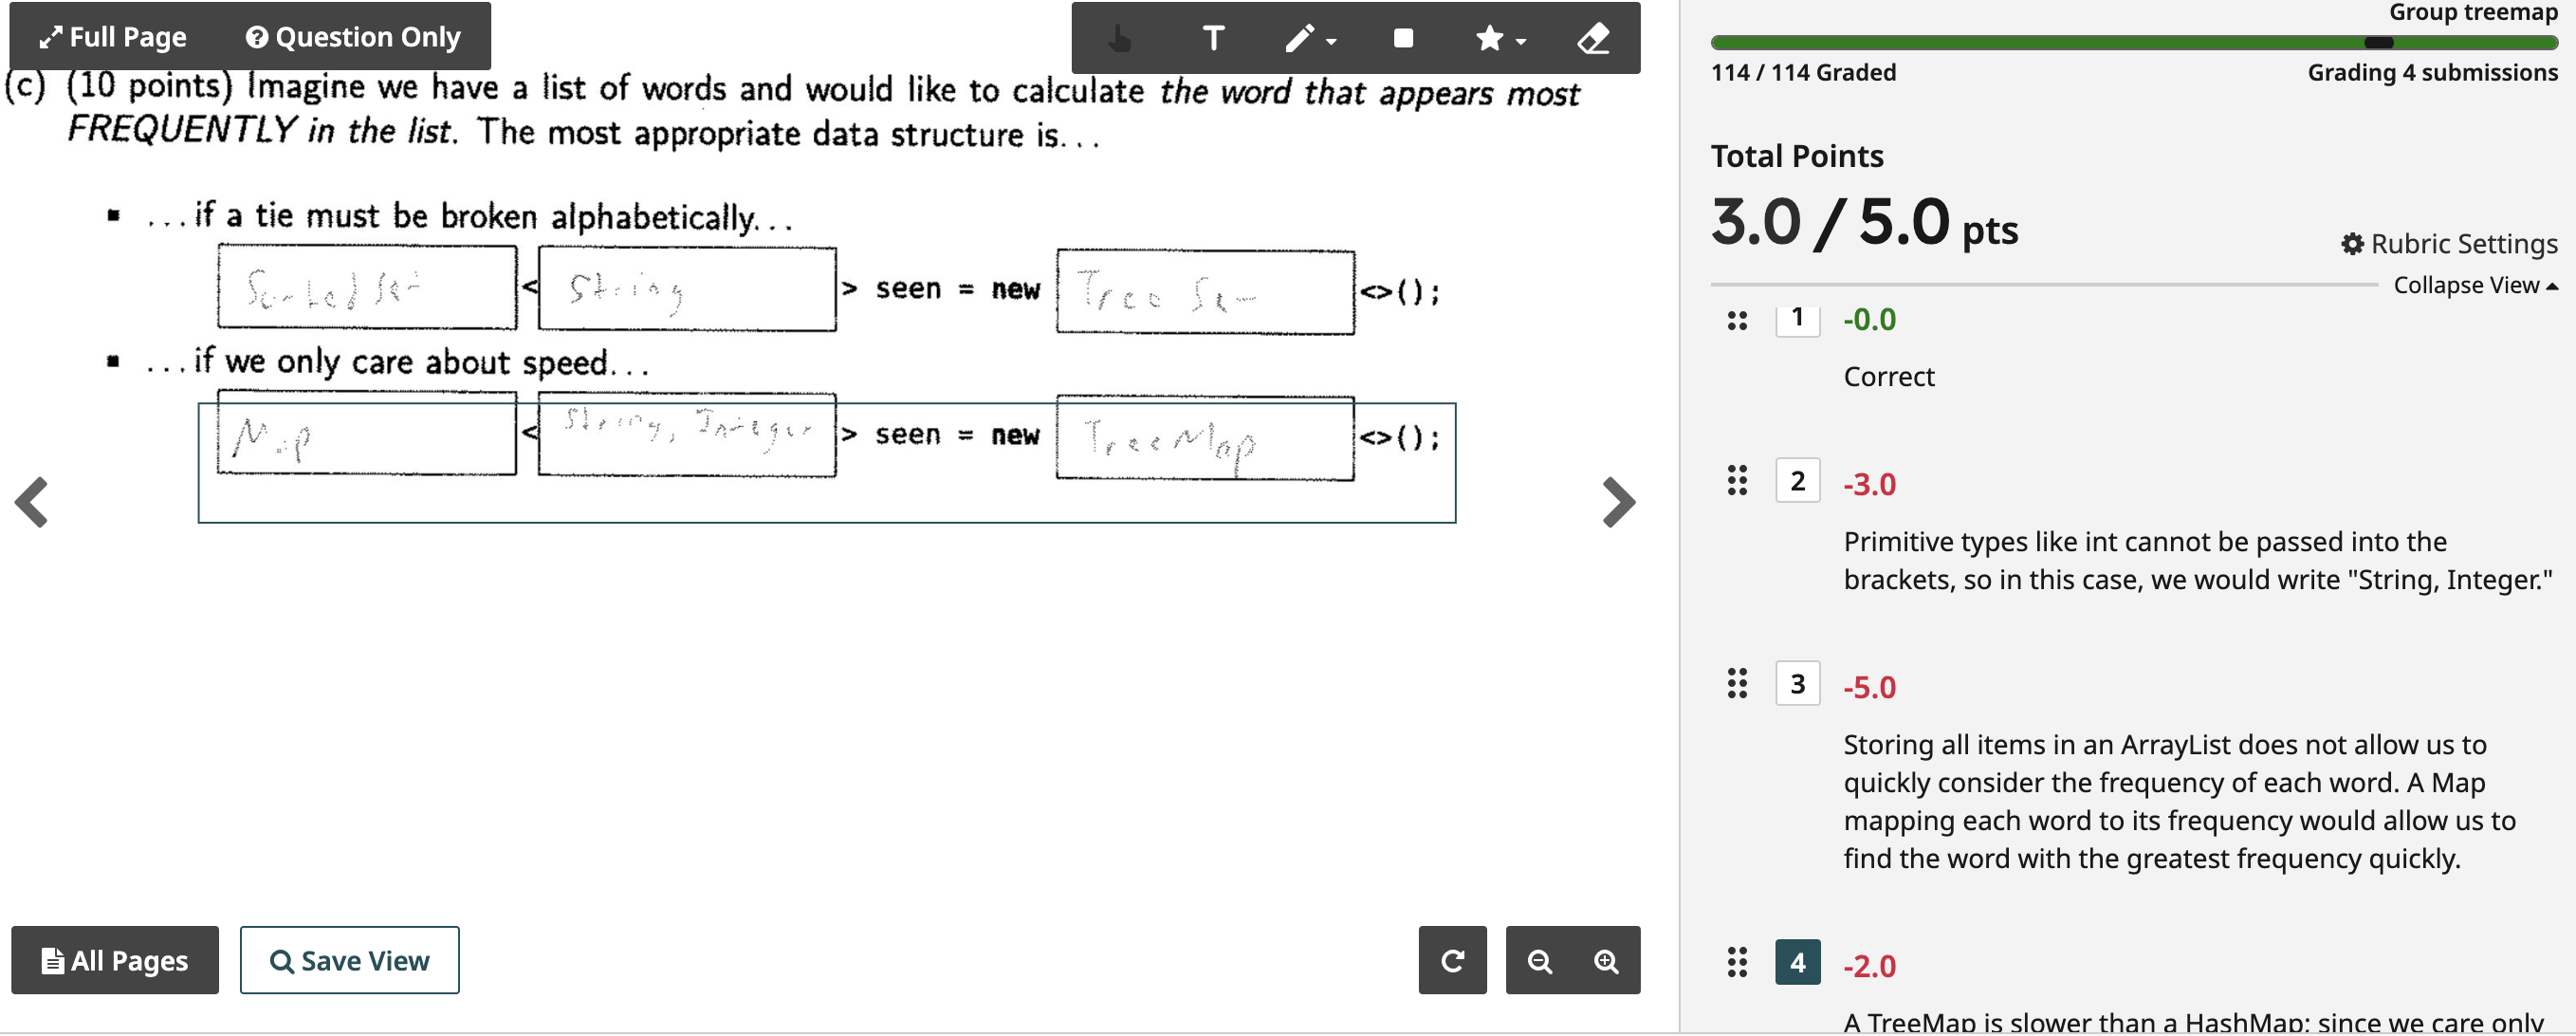
In this picture, you can see how the corresponding rubric item has been applied. When there are multiple rubric items that are applicable, you should apply all of them. To apply a rubric item, click on the number in the top left corner of the item (e.g., the 4 in the picture above). (Keyboard shortcut: you can also press the key corresponding to the number of the rubric item!)
Sometimes, rubric items will have already been created for you. Other times, you will have to create your own rubric items. As you go, if you find that there does not yet exist a rubric item for what you want to say, you should create a rubric item. To see how to write rubric items, see "How do I write rubric items?"
Once you finish applying all relevant rubric items to a submission/group, click on "Next Ungraded" to head on to the next one. Continuously click on "Next Ungraded" until you finish grading. (Keyboard shortcut: you can also just press "Z"!) Again, if in the process of doing this, you have any questions at all, you should immediately raise your hand and ask the professor(s) or a member of course leadership.
How do I write rubric items?
When you find that you want to create a new rubric item, scroll to the bottom of the existing rubric items. Your screen should look similar to the picture below.
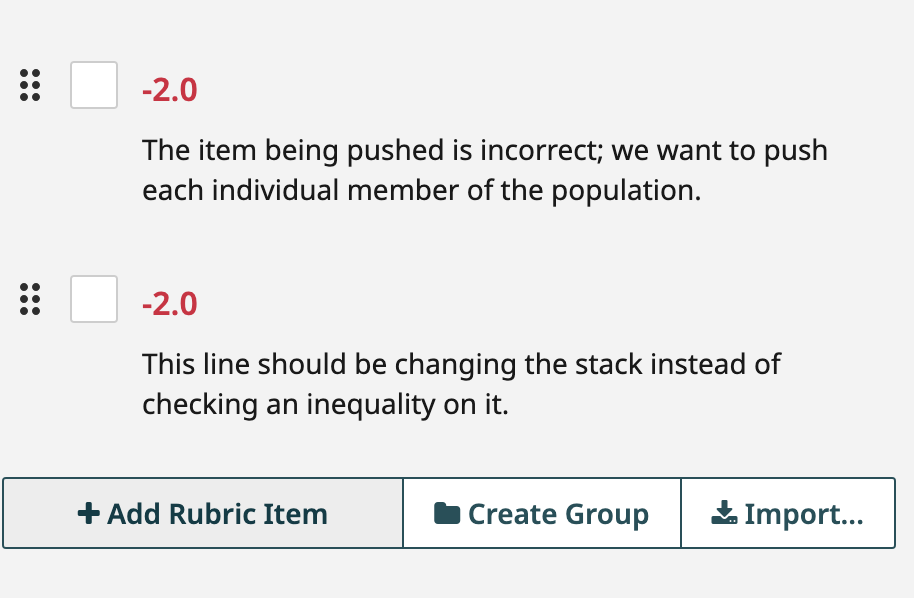
You can click on the "Add Rubric Item" button and begin writing the rubric item description.
We want the descriptions to be in full sentences. A description should concretely state what the student's answer had that was incorrect, and give reasoning as to why that answer is wrong without directly "giving away" the correct answer. This way, the description gives the student useful, wise and constructive feedback. To give an example of what you should and should not do for a rubric item description, we can go back to a previously-shown picture:
Here, we can take as an example the rubric item (2): ".add is not the method to add to the top of the stack." This would apply when the submission was something like potentialCelebs.add(i), where potentialCelebs is a stack in Java. Below are examples of rubric item descriptions that would not work and why:
- "wrong": This is not a full sentence and does not give the student wise and constructive feedback. (In fact, it doesn't even mention which part of the answer is "wrong!")
- "You should have used
.pushinstead of.add." This directly gives away the correct answer; even worse, it does so without providing reasoning.
The rubric item description as is works because it concretely states something the submission had that was incorrect (".add") and why ("is not the method to add to the top of the stack"), but does not give away the correct answer (that "push" was the correct method).
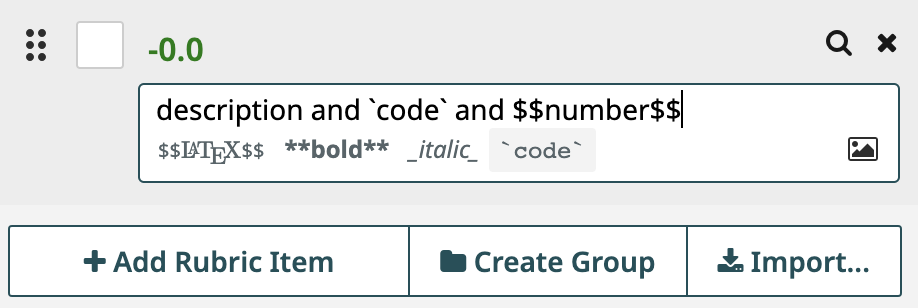
Regarding formatting, we want code and mathematical statements to stand out as such, and be formatted differently from English text. For instance, if you want to refer to the method ".add" in your rubric item description, you want it to show up as .add. The picture below shows how you can format different types of writing in your description (in order from left to right: plain English description, code, and LaTeX formatting for mathematical statements).
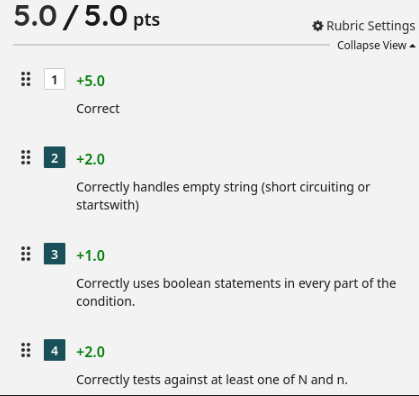
Moreover, thus far, we have been describing something called negative grading: this is when we grade by applying items describing what the student did incorrectly. You can see that in the pictures, the items describe incorrect actions and the point values are negative. Sometimes, the professor(s) might want to use positive grading, which is when we grade by applying items describing what the student did correctly, and the point values from these items "build up" to the student's score. For positive grading, you would write rubric item descriptions similarly to what we've described above. They should be in full sentences, with concrete statement of something the student did correctly. See the picture below for an example of positive grading.
When you add a new rubric item, you should not assign any point value to it unless otherwise told to do so.
FAQ (Frequently Asked Questions)
What is the "Review Grades" section for?
The "Review Grades" section shows the statistics of that quiz. It will show the minimum, median, maximum, mean, and standard deviation of scores, as well as list every student's score. As a TA, you do not have to "do anything" for this section: it provides information to the professor(s) and course leadership.
What do I do if I get a regrade request?
Unless otherwise told, you as a TA should not be responding to regrade requests. They will be handled by course leadership. You can also turn off emails for regrade requests to avoid notifications about those filling up your inbox.
What do I do if a student asks me about how they were graded, or about when grades will come out?
If a student individually asks you something such as, "Why was this question graded so harshly?", you can redirect them to contact the course email about their concerns. If grades have not been released yet and they ask you when grades will come out, be honest with the student if you do not know. If you do know that grades are coming out soon, you can tell the student that they'll be out "in the next few weeks; we're doing our best."
Grading Equity
It is important to be aware of grading equity issues and to make a conscious effort to be equitable when grading. Some examples of grading equity issues include:
- when a student has a non-standard solution. If a student's solution does not follow the reference solution or is not something you understand, you should not immediately mark it wrong; rather, you should take a reasonable amount of time to try to understand it. You can also ask course leadership and/or the professor(s) to take a look at their solution.
- when you can't read the student's handwriting, or the scanned picture on Gradescope. If this happens, rather than immediately marking the submission wrong, you should spend the effort to try to decipher their handwriting or the faulty scan, and again, ask course leadership for help if needed. In general, be aware of handwriting bias (in general in grading, students tend to get worse grades if their handwriting is worse, even for the same answer).